Caching with NCache in ASP.NET Core
NCache is a cross-platform, open-source distributed caching system by Alachisoft that is exceptionally fast and linearly scalable.
In this article, we will talk about Distributed Caching, NCache, and its features such as Object Caching, Session Caching, and Response Caching along with practical implementation in ASP.NET Core.
What is distributed caching
A distributed cache is a cache that is shared by multiple app servers and is often managed as an external service to the app servers that access it.
While most caches are traditionally housed in a single physical server or hardware component, a distributed cache can expand beyond the memory limits of a single computer by connecting multiple computers—referred to as a distributed architecture or a distributed cluster—for increased capacity and processing power.
A distributed cache can increase the efficiency and scalability of an ASP.NET Core project, particularly if the app is hosted by a cloud service or a server farm. Distributed caches are extremely useful in high-data-volume and high-load applications. Because of the distributed design, incremental expansion and scaling are possible by adding more computers to the cluster, allowing the cache to grow in tandem with the data growth.
When cached data is distributed, the data:
- Is coherent (consistent) across requests to multiple servers.
- Survives server restarts and app deployment.
- Doesn't use local memory.
What is NCache
NCache is an open-source distributed in-memory cache developed natively in .NET and .NET Core. NCache is a distributed cache that stores application data and prevents expensive database trips. It is extremely quick and linearly scalable. NCache can be used to reduce performance bottlenecks caused by data storage and databases, as well as to extend the capabilities of your .NET Core applications to handle high-volume transaction processing (XTP). It works both locally and configured as a distributed cache cluster for an ASP.NET Core app running in Azure or other hosting platforms.
Some major features of NCache
Some major features of NCache are:
- Recovery from Split-Brain
- ASP.NET Core Object, Session, and Response caching
- WAN Replication
- Search Cache (SQL-Like)
- Security and Encryption
- Data Grouping
- Runtime Data Sharing
- Cache Topologies
- Cache Size Management
- Cache Elasticity (High Availability)
How to use NCache with ASP.NET Core (a tutorial)
Let’s dive into a step-by-step practical implementation of NCache with .NET 6.
Setting up an environment
Let's have a look at how to set up an NCache server on a Windows machine. For this, we need a windows installer. Let’s install NCache Enterprise edition, version 5.3.
- NET Framework 4.8
- NET 6.0
Follow these steps to install NCache using an interactive Windows installer:
- Open command prompt as administrator. This is because NCache must be installed by an administrator user.
- Run msiexec.exe utility from Command Prompt to install NCache in an interactive mode. Please note that the .msi file may have a different name for the .NET Framework installation.
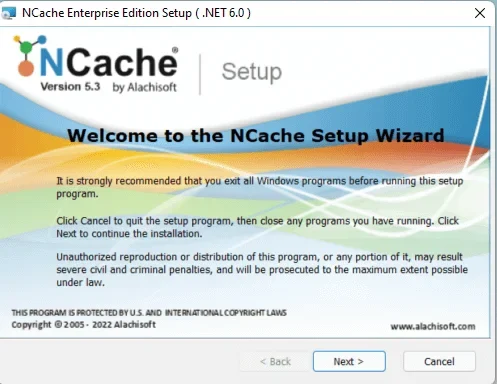
msiexec /i "<Setup Path>\ncache.ent.net.x64.msi"The NCache Setup Wizard welcome screen appears:
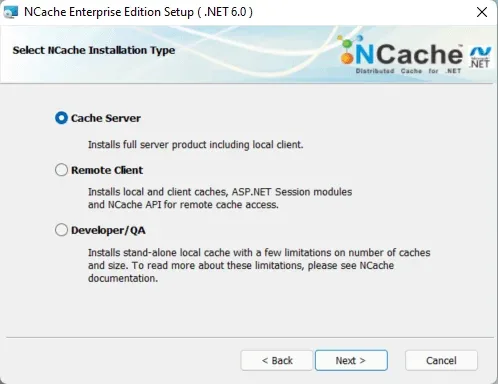
After launching the installer, we must choose between three installation types: cache server, remote client, and developer/QA. Let’s select Cache Server.
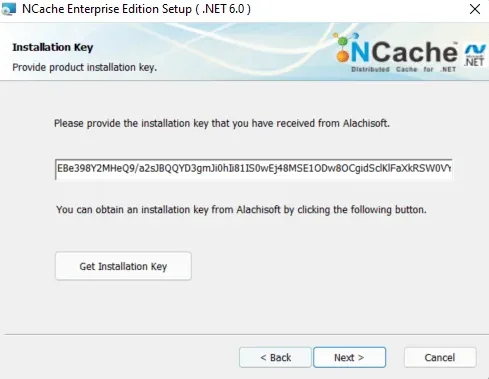
After that, we must input a license key. Make sure you have a license key for the same version as the one you're installing. We'll receive an "invalid license key" error otherwise. The license key is sent to the email address you provided during registration.
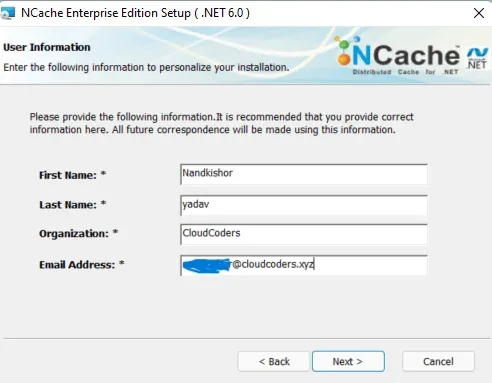
After that, we need to enter our full name, email address, and the organization that we used to apply for the trial license.
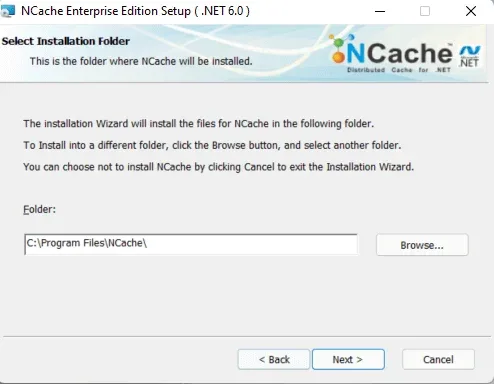
Next, select the installation folder where NCache should be installed. Keep the default location or change it if required.
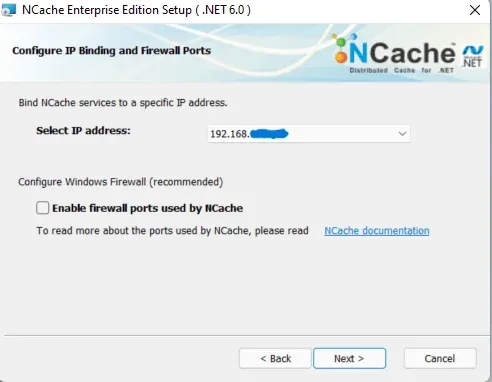
Then, we need to select an IP address to bind our NCache server to. Let’s stick to the defaults.
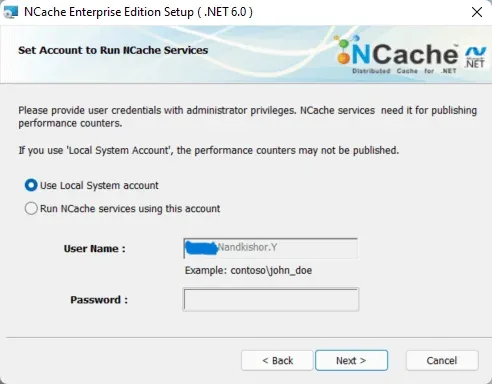
Next, we need to choose an account to run NCache. Let’s use the Local System Account.
NCache service creates and starts a demo cache named demoCache of topology Partitioned-Replica by default at the end of setup installation. Uncheck the checkbox Start demo cache at the end of the installation to disable this option from this screen. When you're finished, click Install.
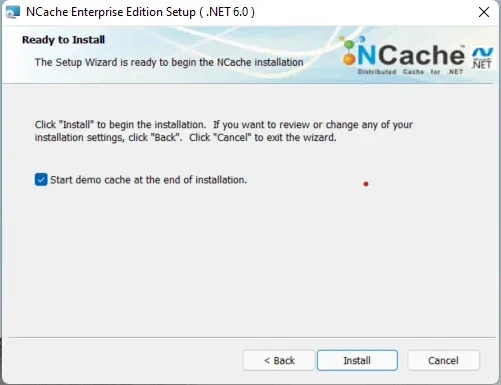
Once the installation finishes, our default browser will open with the Web Manager at http://localhost:8251

The official site of NCache suggests a minimum of two servers for redundancy. However, for testing, let's use a single-node server.
At this point, we have successfully installed the NCache server on a windows machine. However, NCache can be installed in Linux and Docker containers and can be used on Azure and AWS as virtual machines.
Creating a clustered cache
Now, let's see how we can manually create a cluster cache from the web manager which is running at http://localhost:8251/.
In the left navigation bar, click on Clustered Caches. The page displays any clustered caches on your machine, as well as additional information such as topology, servers, and server platform.
-
To create a new distributed cache, click on New.

-
Select Distributed Cache from the In-Memory Store Type dropdown menu and give your cache a name. Choose JSON or Binary from the Serialization dropdown option, depending on your needs. It is recommended that you use JSON serialization if you are using ASP.NET 5.0 and above.
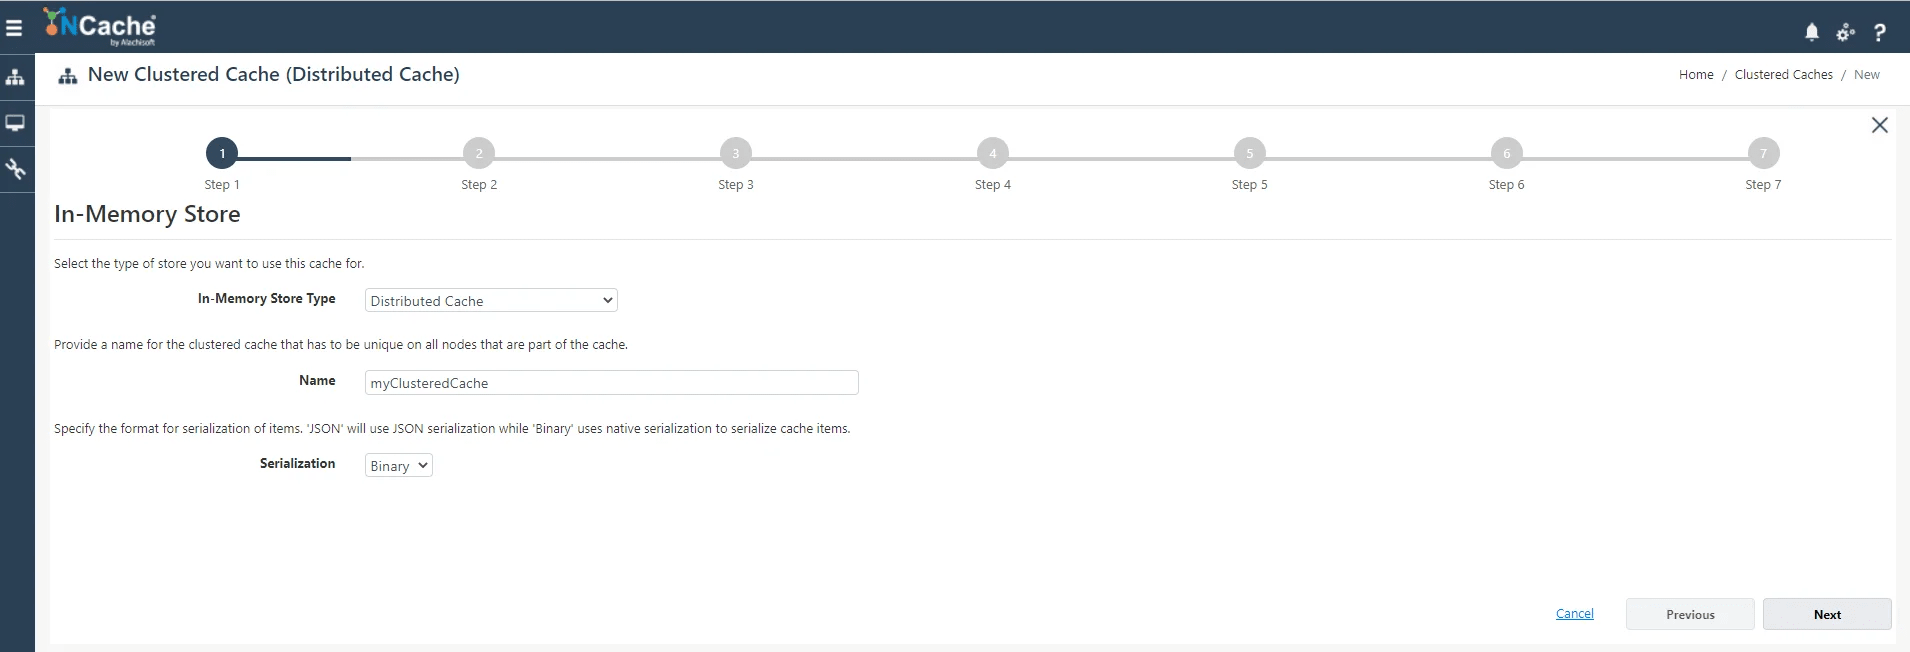
-
Choose the caching topology as well as advanced options such as Operation Timeout and Statistic Replication Interval. If you choose the Partition-Replica Cache topology, you must choose an Asynchronous or Synchronous Replication Strategy.
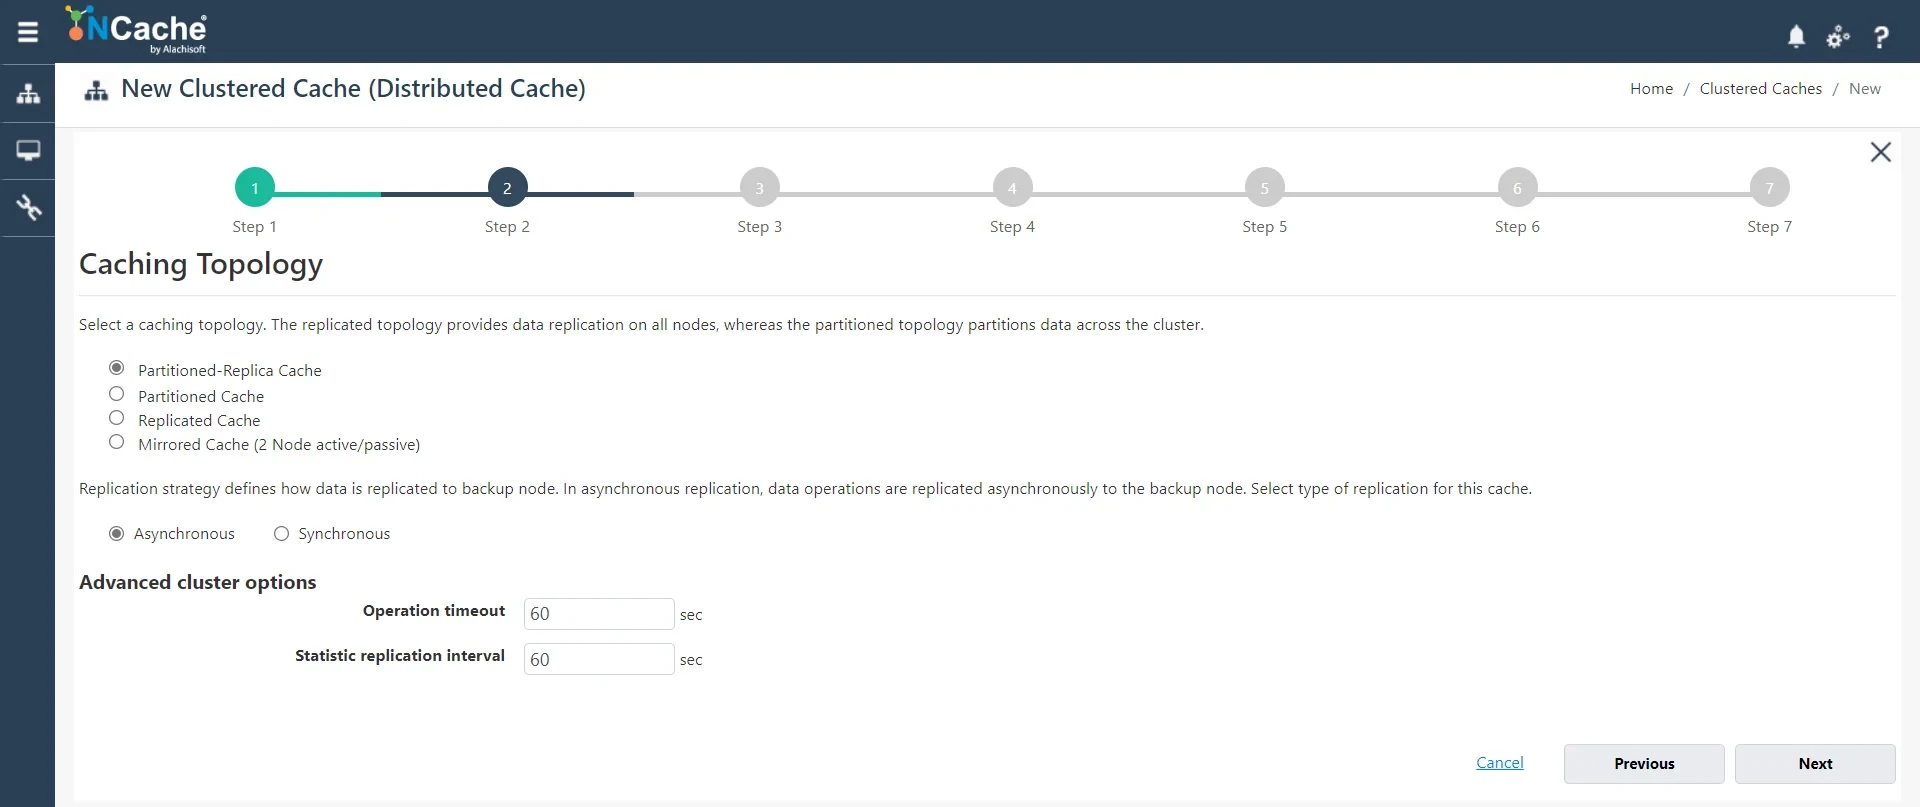
-
If necessary, set the cache's maximum size. You can also add cache nodes to the cluster by specifying the node IP address and clicking on +. To add more nodes, click +.
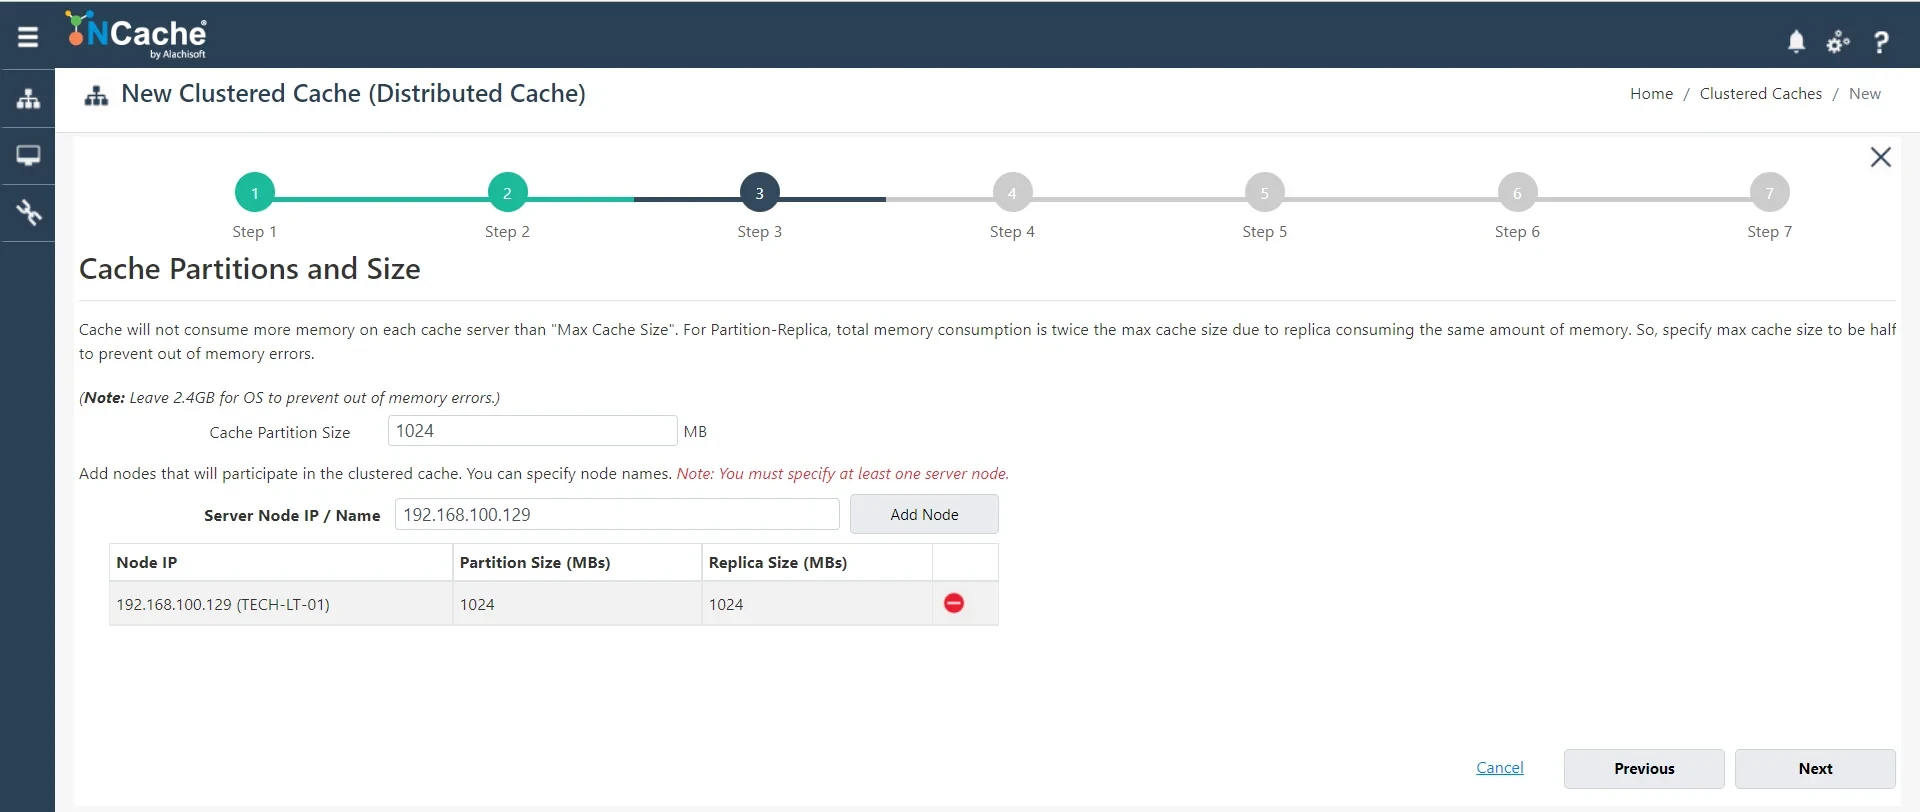
-
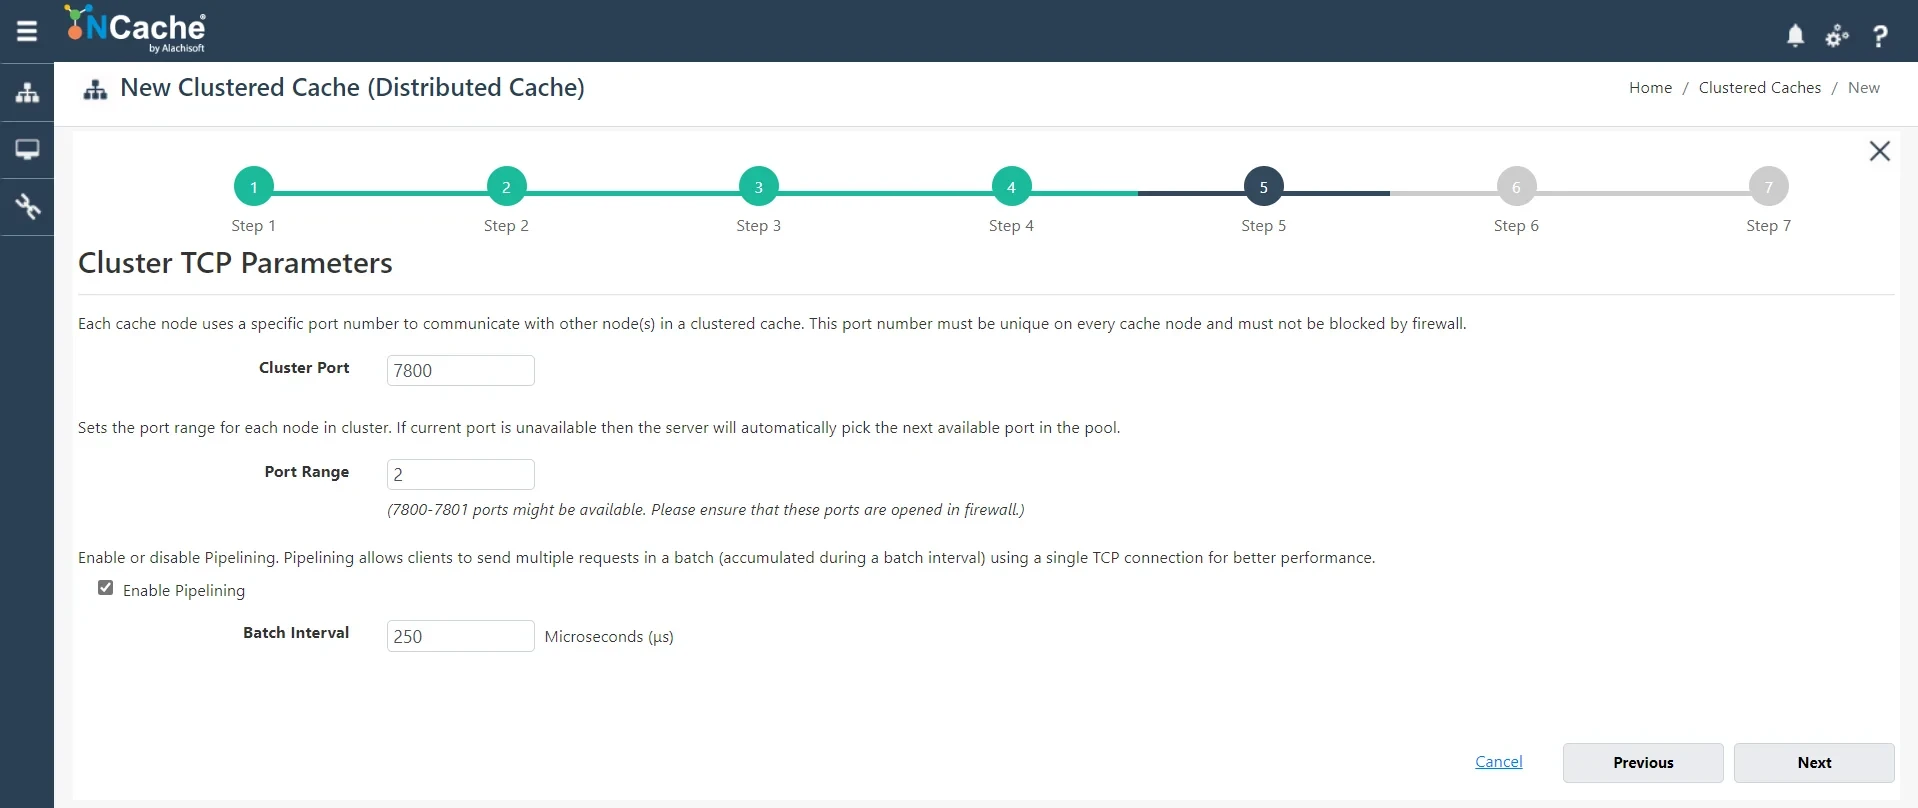
If necessary, change the Cluster Port and Port Range. Check the Enable Pipelining option if pipelining is necessary for the cache. Set the Batch Interval to the time in microseconds after which the commands will be sent across the network.
-
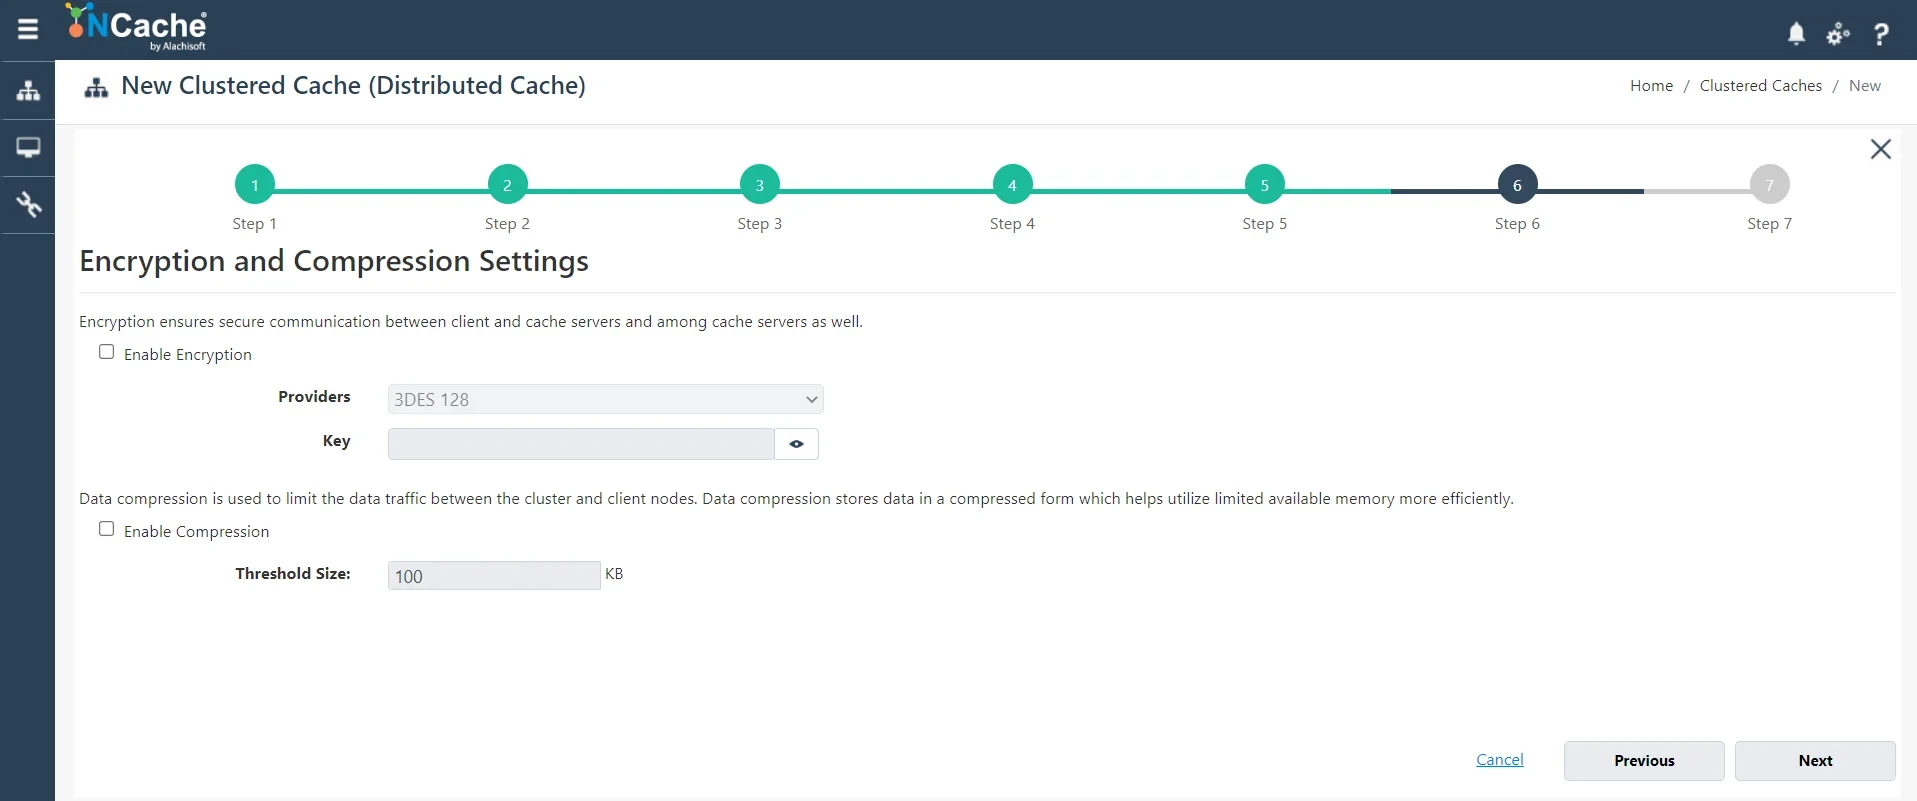
Check the Enable Encryption and Enable Compression options to enable encryption and compression. Set the Providers and Key for encryption and the Threshold Size for compression if encryption is enabled.
-
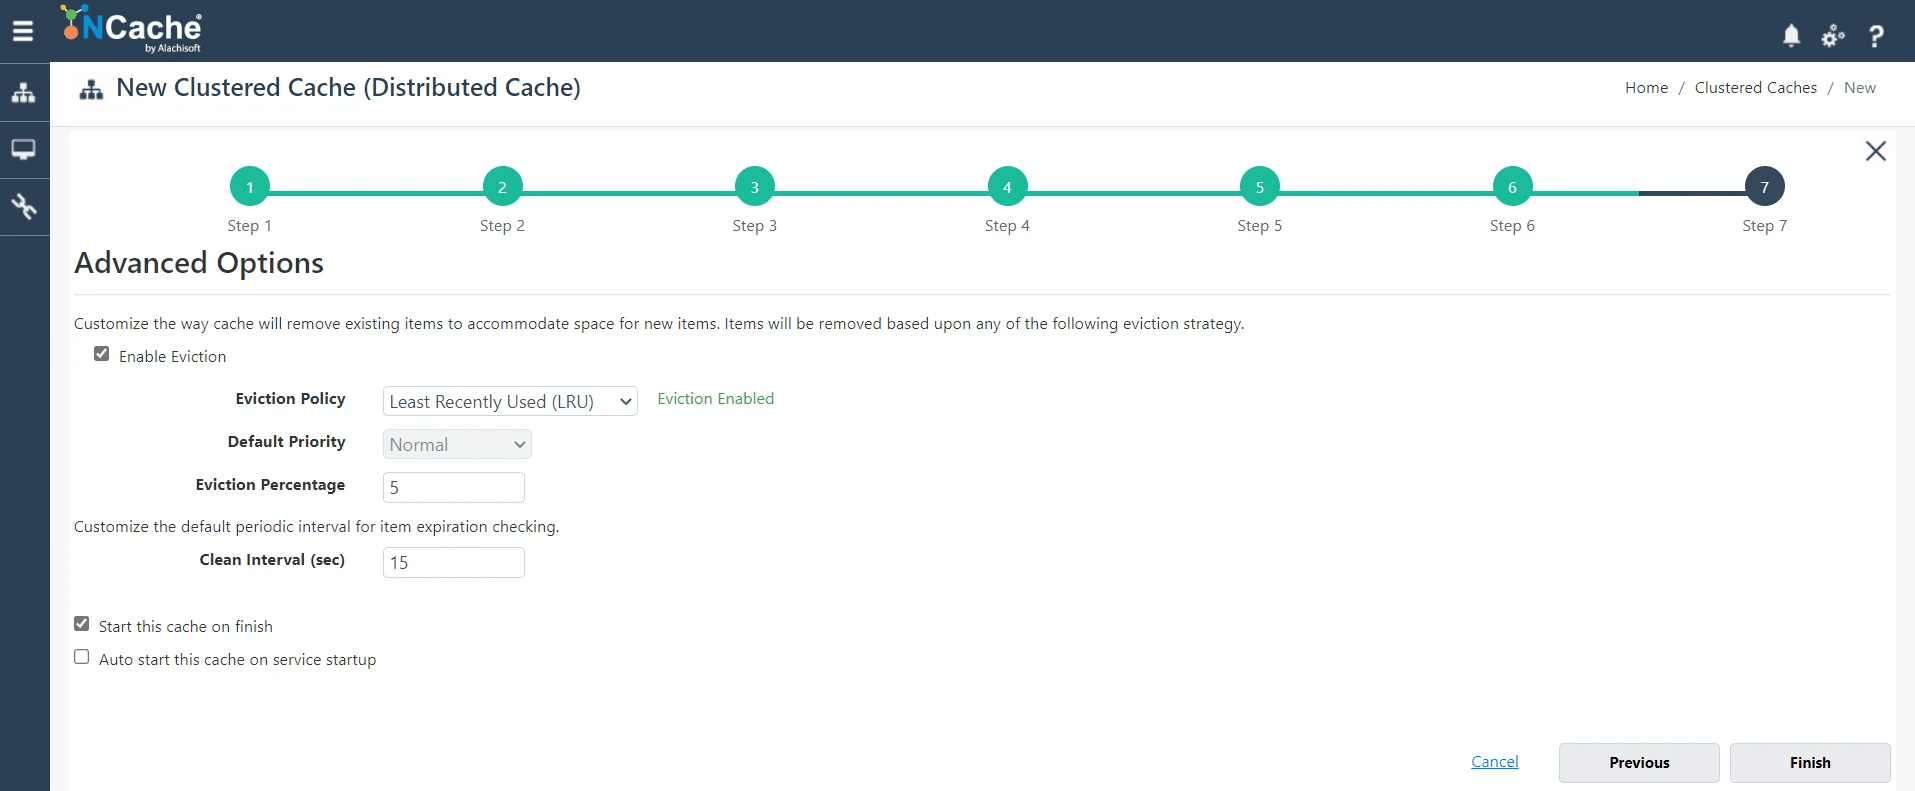
On the Advanced Options page, you can configure the following settings:
- By default, eviction is enabled. You can adjust the Eviction Policy as needed. Uncheck the box Enable Eviction if you wish to disable eviction.
- You can also adjust the Eviction percentage; if eviction is enabled, items will be evicted from the cache using this % value.
- You can change the Clean interval value. Default is 15 seconds.
- If you click the Start this cache on Finish checkbox on this dialog box, this cache will be started automatically after this process is completed.
- You can make the cache start automatically after service restart by checking the checkbox Autostart this cache on service startup.
-
The server nodes and status of the newly created cache will display in the Clustered Caches page.

Simulating stress and monitoring statistics
NCache provides the Test Stress option to simulate the usage of your created cache.
Test Stress Through NCache Web Manager
To simulate your cache utilization under stress using NCache Web Manager, follow the instructions below:
- Launch NCache Web manager by browsing localhost:8251
- From the left navigation bar, click on Clustered Caches.

- Click the Test-Stress button on the toolbar to bring up a dialog box containing various time options.

- You may choose how long you want the Test-Stress to run from the options provided. The choices are:
- 10 seconds
- 30 seconds
- 1 minute
- 3 minutes
- 5 minutes
- This is the duration for which the data will continue to be added to your cache, and once that time has passed, the data will be deleted from the cache.
- There are two ways to see how these cache counts are updated. Either use the Monitor option on the toolbar to see the cache counts or use the Statistics option to keep track of your cache's statistics.
- The following are the specifics for both of the above options.
View Simulation Through NCache Web Monitor
NCache Web Monitor provides various cache counters in a graphical dashboard.

The counters on NCache Web Monitor show that data is being added to the cache. The counters will show data being removed from the cache when the given expiration time has passed.
View Simulation Through NCache Statistics
NCache Statistics provides a report view of various cache counters. If you choose to simulate cache usage through statistics, then follow these steps:

- Click the Test-Stress button on the toolbar to bring up a dialog box containing various time options.

- You can choose the Tess-Stress timer for 10 or 30 seconds or 1, 3, or 5 minutes, depending on your choice from the dialogue box.
- As soon as you press the Start button, you can view the statistics for different operations on the cache like Additions/sec and Fetches/sec.
- You can see the data being added to the cache by looking at the counters on the screen. The counters will indicate data being purged from the cache when the given expiration time has passed.

Test Stress Through NCache PowerShell Cmdlet
You can quickly test that cache clients can make calls to cache servers using the Stress Test Tool that comes with NCache installation.
Run the following command in Windows PowerShell to begin this test on the cache you just created:
Test-Stress –CacheName ClusteredCacheUsing NCache for object caching in ASP.NET Core
Before connecting to our NCache server, we need to first install the Nuget package. Let's Install the package by executing the following command in the Package Manager Console.
With NCache SDK NuGet package
For Enterprise
Install-Package NCache.Microsoft.Extensions.CachingFor Professional
Install-Package NCache.Microsoft.Extensions.Caching.ProfessionalFor OpenSource
Install-Package NCache.Microsoft.Extensions.Caching.OpenSource
Now, to start the connection, we need the GetCache() method with a cache name. For our sample app, let's use the cache name that we created above.
Let's start writing some code to add and retrieve the cities from a cache.
[HttpGet("{id:int}")]
        public async Task<IActionResult> Get(int id)
        {
            ICache _cache = CacheManager.GetCache(_configuration.GetValue<string>("NCacheSettings:CacheName"));
            var cacheKey = string.Format("city_{0}", id);

            var city = _cache.Get<City>(cacheKey);

            if (city is null)
            {
                city = await _cityRepository.GetByIdAsync(id);

                var cacheItem = new CacheItem(city)
                {
                    Expiration = new Expiration(ExpirationType.Sliding, TimeSpan.FromMinutes(10))
                };

                // Add CacheItem to cache
                await _cache.InsertAsync(cacheKey, cacheItem);
            }

            return Ok(city);
        }
Notice we didn’t have to use a connection string to connect to our cache. We only used a cache name that is defined in the appsettings.json file.
"NCacheSettings": {
    "CacheName": "myClusteredCache",
    "EnableLogs": true,
    "EnableDetailLogs": false,
    "ExceptionsEnabled": true,
    "OperationRetry": 0,
    "operationRetryInterval": 0
  }
Instead of connection strings, NCache uses a client.ncconf file. This file can be defined at the application or installation level. We rely on the configuration file at the installation level for our demo. As a result, we just need the cache name.
In the code snippet above, we are fetching the city from the cache first. The initial call will have an empty cache and it will get the data from the database and add it to the cache, so that the next time when we call this endpoint, the data will be returned from the cache instead of hitting the database.
Every item in the cache needs an expiration. The CacheItem has an Expiration property for that.
There are two basic expiration types: Absolute and Sliding. You can learn more about expiration types here.
To add the item with the same key, we used InsertAsync() method. There's another method Remove() and RemoveAsync(). You might have already guessed what they do.
With IDistributedCache
Up to this point, we have NCache installed and know how to add and retrieve items.
Using the IDistributedCache interface provided by Dotnet Core, we can connect our ASP.NET Core apps to any distributed cache cluster and utilize it for caching as needed. Almost all major cache providers provide IDistributedCache implementations, which we can register in the IoC container using IServiceCollection.
Now, let's look at how we can implement distributed caching with NCache as the caching provider.
To connect to the cache server, we need to install the NuGet package Install-Package NCache.Microsoft.Extensions.Caching which we have already installed in the previous section.
We can register the NCache DistributedCache into the IoC container, through which we can later access the caching service. We can place this inside ConfigureServices() method of Startup.cs
services.AddNCacheDistributedCache(configuration =>
    {
    configuration.CacheName = "myClusteredCache";
    configuration.EnableLogs = true;
    configuration.ExceptionsEnabled = true;
    });
We can also use these configuration values using another overload of the same method as below if you want to configure the cache settings in the appsettings.json file, which we will be doing in this demo.
services.AddNCacheDistributedCache(Configuration.GetSection("NCacheSettings"));"NCacheSettings": {
"CacheName": "myClusteredCache",
"EnableLogs": true,
"EnableDetailLogs": false,
"ExceptionsEnabled": true,
"OperationRetry": 0,
"operationRetryInterval": 0
}Now, let's look at the code on how to use it to retrieve the lists of cities.
[HttpGet]
public async Task<IActionResult> Get()
{
string recordKey = "CitiesList_" + DateTime.Now.ToString("yyyyMMdd_hhmm");
var cities = await _cache.GetRecordAsync<List<City>>(recordKey);
if (cities is null)
{
cities = (List<City>)await _cityRepository.ListAllAsync();
// Add CacheItem to cache
await _cache.SetRecordAsync(recordKey, cities);
}
return Ok(cities);
}The above snippet attempts to get the list of cities based on the cache key, where if there is no item existing in the cache, the items are fetched from the database.
The implementation of GetRecordAsync() and SetRecordAsync() is as below.
public static class DistributedCacheExtensions
{
public static async Task SetRecordAsync<T>(this IDistributedCache cache,
string recordId,
T data,
TimeSpan? absoluteExpireTime = null,
TimeSpan? unusedExpireTime = null)
{
var options = new DistributedCacheEntryOptions
{
AbsoluteExpirationRelativeToNow = absoluteExpireTime ?? TimeSpan.FromMinutes(10),
SlidingExpiration = unusedExpireTime
};
var jsonData = JsonSerializer.Serialize(data);
await cache.SetStringAsync(recordId, jsonData, options);
}
public static async Task<T> GetRecordAsync<T>(this IDistributedCache cache, string recordId)
{
var jsonData = await cache.GetStringAsync(recordId);
if (jsonData is null)
{
return default(T);
}
return JsonSerializer.Deserialize<T>(jsonData);
}
}You can read this article to understand the concepts of the above snippet.
Using NCache for session caching in ASP.NET Core
Since the HTTP protocol used by web applications is a stateless protocol, data is not stored anywhere; the browser opens a new HTTP connection for each web request. ASP.NET Core supports sessions for storing user data in situations when preserving your data is critical. The ASP.NET Core application itself maintains this datastore on the same server as the application.
Although ASP.NET Core has an in-memory session provider for storing sessions, the load must sometimes be balanced. Session storage strategies such as sticky sessions and distributed caching are used in these cases, however, sticky sessions are not recommended.
With NCache sessions services NuGet package
Let's see how we can configure the NCache session provider in ASP.NET Core.
First, we need to install the NuGet Package in our application.
Install-Package AspNetCore.Session.NCacheTo utilize the APIs, include the following namespace in your application in Startup.cs
using Alachisoft.NCache.Web.SessionState;Using NCache Session Management Services with ASP.NET Core requires two steps:
- Configuring the session management service.
- Adding middleware to the application.
Serializing Session Objects
Before you begin utilizing NCache to store and retrieve your ASP.NET session data, you should be aware that these objects cannot be directly stored within the cache. To save these session objects in the cache, they must first be serialized. You can serialize your session objects using different approaches. These techniques are as follows:
Binary Serialization
If you have access to the application's source code, you can utilize this serialization approach. In this instance, you must make all of the objects (those you wish to keep in the cache) serializable. However, since of.NET 6.0, this approach is no longer supported.
NCache Compact Serialization
If you can't or don't want to utilize binary serialization, you can serialize your session objects using NCahce Compact Serialization. The key advantages of doing so are that it is quicker and simply requires you to alter your configuration files rather than the source code.
The only issue with this technique is that the configuration change might be significant if the number of classes to serialize is large.
JSON Serialization
If neither of the above serialization options works for you, you can use JSON serialization instead. The best aspect of this strategy is that it is really fast and easy since it only takes you to make one modification to your appsettings.json file, and the rest of the work is done automatically by NCache during runtime.
You only need to set the usejsonserialization setting to true. This flag's value is false by default.
Step 1: Configure NCache Session Management Service
The session management service needs to be initialized in Startup.cs. There are two methods to specify configurations:
- Through your application in Startup class or
- In JSON format in Appsettings.json
Method 1: Specifying Configurations in Startup class
The AddNCacheSession() extension method, which accepts an IOptions<NCacheSessionConfiguration> object as the configuration can be used to start the session.
Add the following code to your application's Startup class in the ConfigureServices() method:
public void ConfigureServices(IServiceCollection services)
{
//Add services to the container with configured session
services.AddNCacheSession(configuration =>
{
configuration.CacheName = "myClusteredCache";
configuration.EnableLogs = true;
configuration.SessionAppId = "demoApp";
configuration.SessionOptions.IdleTimeout = 5;
configuration.SessionOptions.CookieName = "AspNetCore.Session";
});
}Method 2: Specifying Configurations in Appsettings.json
The configurations for the services can also be provided in JSON format as a section in Appsettings.json of your ASP.NET application:
{
"NCacheSettings": {
"SessionAppId": "demoApp",
"SessionOptions": {
"CookieName": "AspNetCore.Session",
"CookieDomain": null,
"CookiePath": "/",
"CookieHttpOnly": "True",
"IdleTimeout": "5",
"CookieSecure": "None",
"useJsonSerialization": true,
},
"CacheName": "myClusteredCache",
"EnableLogs": "True",
"RequestTimeout": "90"
},
}NCache provides the AddNCacheSession() method to initialize configurations from external files before adding the session services to the container. You can use this method to refer to the configurations by specifying the name of the section in Appsettings.json that contains JSON format configurations:
public void ConfigureServices(IServiceCollection services)
{
//Add services to the container
services.AddNCacheSession(Configuration.GetSection("NCacheSettings"));
}
Step 2: Add Middleware to the Application
After the services have been initialized, you can now set up the HTTP request pipeline by using the Configure() method to add middleware. The following is an example of how to add a middleware layer in IApplicationBuilder by using the UseNCacheSession() extension method. Always stack the NCache session middleware before the layer that uses the sessions.
public void Configure(IApplicationBuilder app, IWebHostEnvironment env)
{
app.UseNCacheSession(); //store NCache session data
}Once NCache has been set as the default cache for ASP.NET Core sessions, you can execute all ASP.NET Core-specific operations without changing any code. All sessions will be cached in distributed NCache.
You can find the additional source code on GitHub.
With IDistributedCache
ASP.NET Core sessions can also be used with NCache's IDistributedCache Provider. To add a default implementation of IDistributedCache, use the AddDistributedMemoryCache() function in ASP.NET Core. To use NCache as a distributed cache to store ASP.NET sessions or objects, use the AddNCacheDistributedCache() extension method, which adds NCache as the default distributed cache as an implementation of IDistributedCache.
First, install the NuGet package depending on the version of NCache you are using.
To utilize the APIs, include the following namespace in your application in Startup.cs of your application:
using Alachisoft.NCache.Caching.Distributed;You can configure NCache as a distributed cache for your ASP.NET Core application in two steps:
- Configuring services
- Adding middleware to the application
Step 1: Configure Services
The AddNCacheDistributedCache() extension method on IServiceCollection requires just a cache name in NCache and any optional parameters to store the sessions. The configuration object is the same as NCache ASP.NET Core Session Provider, and it can be started in the same way. The settings can also be given using the IOptions initializer.
There are two methods to specify configurations:
- Through your application in Startup class or
- In JSON format in Appsettings.json of your application.
Method 1: Specifying Configurations In Startup class
Configure Startup class for Single Cache:
The AddNCacheDistributedCache() method is an extension of the ASP.NET Core AddDistributedCache() method. This method takes configuration parameters from your application's Startup class file or reads them from the supplied JSON file.
Add the following methods and options to your application's Startup class:
public void ConfigureServices(IServiceCollection services)
{
services.AddNCacheDistributedCache(configuration =>
{
configuration.CacheName = "myClusteredCache";
configuration.EnableLogs = true;
configuration.ExceptionsEnabled = true;
});
}
Configure Startup class for multiple Cache:
Using the AddNCacheDistributedCacheProvider method, you may configure multiple caches as follows:
public void ConfigureServices(IServiceCollection services)
{
services.AddNCacheDistributedCacheProvider( options =>
{
options.CacheConfigurations = new NCacheConfiguration[] {
new NCacheConfiguration() {
CacheName = "myClusteredCache",
EnableLogs = true,
ExceptionsEnabled = true
},
new NCacheConfiguration(){
CacheName = "demoCache",
EnableLogs = true,
ExceptionsEnabled = true }
};
});
}
Method 2: Specifying Configurations In Appsettings.json
In the Appsettings.json file of your application, you can also specify the configurations within your application in JSON format. You can refer to the configurations using this method by specifying the name of the section in the Startup class that contains JSON format configurations.
{
"NCacheSettings": {
"CacheName": "myClusteredCache",
"EnableLogs": "True",
"RequestTimeout": "90"
},
}Refer to these configurations in the Startup class as follows:
public void ConfigureServices(IServiceCollection services)
{
services.AddNCacheDistributedCache(Configuration.GetSection("NCacheSettings"));
services.AddSession();
}Configure Appsettings.json for Multiple Caches:
"NCacheFactorySettings": {
"NCacheConfigurations": [
{
"CacheName": "myClusteredCache",
"EnableLogs": true,
"RequestTimeout": "90"
},
{
"CacheName": "demoCache",
"EnableLogs": true,
"RequestTimeout": "90"
},
{
// Configure more caches
}
]
}Use the AddNCacheDistributedCacheProvider method to refer the NCacheFactorySettings section in Startup.cs:
public void ConfigureServices(IServiceCollection services)
{ services.AddNCacheDistributedCacheProvider(_config.GetSection("NCacheFactorySettings"));
services.AddSession();
}
Step 2: Add Middleware to the Application
Sessions can store data in NCache once the distributed cache has been added to the service. The ASP.NET Core UseSession() extension method adds the default session middleware to the application, but it uses NCache as its cache.
The following block of code represents how to fetch an item from the cache and how to insert an item in it.
public IActionResult CacheOperations()
{
// Cache entry is of DateTime type
DateTime cacheEntry;
string cacheKey = "MaxValue: " + DateTime.MaxValue;
// Look for cache key
object retrieveObj = _cache.Get(cacheKey);
// Check if key exists in cache
if (retrieveObj != null)
{
// Return view with result
}
else
{
// Key not in cache, so populate data in cache entry
cacheEntry = DateTime.MaxValue;
// Configure SlidingExpiration for item
var cacheEntryOptions = new DistributedCacheEntryOptions();
cacheEntryOptions.SlidingExpiration = TimeSpan.FromMinutes(30);
// Insert item in cache
_cache.Set(cacheKey, new byte[1024], cacheEntryOptions);
// Return view with cacheEntry
}
}Using NCache for response caching in ASP.NET Core
The ability to cache web server responses using cache-related headers in HTTP response objects is referred to as response caching. These headers indicate how to cache responses for all or a subset of requests. It is important to note that, unlike output caching, response caching in ASP.Net Core does not store responses in the web server's memory.
Response caching in ASP.Net Core is a more advanced and expandable version of output caching. It instructs web browsers to cache content by including cache-related headers in HTTP responses. This can drastically minimize the number of requests made by a client to the web server, as future requests can be served from the client's cache. It should be noted that response caching caches data in memory by default, but you can set up custom storage providers if necessary.
When to use Response Caching?
You can use response caching to cache objects that are static and have little possibility of being updated, such as CSS, JavaScript files, media, or metadata of a webpage.
To use NCache as a distributed cache for response caching, NCache provides its own extension methods to configure services and middleware.
Installing the NuGet packages: Install the following package from the package manager console in your project.
Install-Package NCache.Microsoft.Extensions.CachingTo use NCache's response caching methods, add the following namespace in your application:
using Alachisoft.NCache.Caching.Distributed;
Configure Response Caching Service
For response caching, ASP.NET Core has its own middleware. This has to be added to the service collection using the AddResponseCaching() method.
- Open the
Startup.csof your project - In the
ConfigureServices()method, add the following service:
public void ConfigureServices(IServiceCollection services)
{
services.AddResponseCaching();
//remaining services here
}
Then add the UseResponsecaching() method to add the response caching middleware to the pipeline.
public void Configure(IApplicationBuilder app, IWebHostEnvironment env)
{
// other code
app.UseResponseCaching();
}With NCache response caching middleware
ASP.NET Core has built-in response caching, which is a great feature. It can be used to limit the number of requests sent to a web server by a client. NCache can also be used as a middleware for response caching. Let's look at how we can do this.
To use NCache as a response cache middleware, you need to do the following:
- Specify the NCache settings in the Appsettings.json file
- Invoke the AddResponseCaching and AddNCacheDistributedCache methods in the ConfigureServices method of the Startup class.
You can configure NCache as a distributed cache in two ways:
- By specifying cache configuration in AppSettings.json
- By specifying cache configuration in IOptions
Specify cache configuration in the AppSettings.json file
"NCacheSettings": {
    "CacheName": "myClusteredCache",
    "EnableLogs": true,
    "EnableDetailLogs": false,
    "ExceptionsEnabled": true,
    "OperationRetry": 0,
    "operationRetryInterval": 0
}The NCache library implements the ASP.NET Core IDistributedCache interface. This enables you to use NCache in ASP.NET Core as a response cache middleware.
In the ConfigureServices() method, write the following code to use NCache as your response cache middleware.
public void ConfigureServices(IServiceCollection services)
        {
            services.AddResponseCaching();
            services.AddNCacheDistributedCache(Configuration.GetSection("NCacheSettings"));
            services.AddMvc();
        }
Specify cache configuration in IOptions
NCache configuration details can also be specified as IOptions.
public void ConfigureServices(IServiceCollection services)
        {
            // other services..
            services.AddMvc();
            services.AddNCacheDistributedCache(options =>
            {
                options.CacheName = "myClusteredCache";
                options.EnableLogs = true;
                options.ExceptionsEnabled = true;
            });
        }
Next, we'll look at how to use NCache as a response caching middleware in the action methods.
You can use the following code to take advantage of response caching in the action method, assuming that you have configured the response caching middleware successfully.
        [ResponseCache(Duration = 60, Location = ResponseCacheLocation.None, NoStore = false)]
        public IActionResult ResponseCache()
        {
            return View();
        }
The Duration option specifies how long the data will be stored in the cache. The ResponseCacheAttribute is used to specify response caching options. You can use the Location argument to specify whether any client or intermediate proxy will cache the data.
Use Distributed Cache Tag Helper
You can now specify the content that you would like to cache. You can take advantage of Distributed Cache Tag Helpers in ASP.NET Core.
The following code snippet illustrates how you can specify an item to remain in the cache forever.
<distributed-cache name="Key:1" >
    <div>@DateTime.Now.ToString()</div>
</distributed-cache>
To set an expiry for a cached item, use the below code
<distributed-cache name="Key:2" expires-after ="TimeSpan.FromSeconds(10)">
    <div>@DateTime.Now.ToString()</div><br />
</distributed-cache>
To remove the item from the cache if the "vary-by" value is changed.
<distributed-cache name="Key:3" vary-by ="test">
    <div>@DateTime.Now.ToString()</div><br />
</distributed-cache>
The source code used in this article is on GitHub.
Summary
Caching is a proven technique used in web applications to improve performance and responsiveness. In this article, I tried to explain in-depth the different features of caching in ASP.NET Core using NCache. For more information on NCache and how it can be used in ASP.NET Core, you can refer to the online documentation for NCache.
